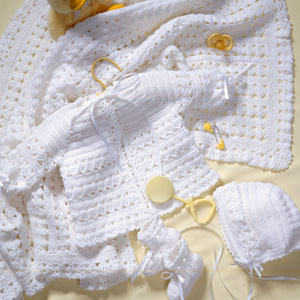
Materials: Baby weight yarn
, 7 oz white; for dress and bonnet, size 3, 10" straight
knitting needles
and 26" circular needle; for booties, size 4, 10" straight needles (or sizes needed for gauge); 1 large and 2 medium stitch holders; 11/2 yds, 1/4" wide
white satin ribbon
; three 3/16"
white buttons
; 1 stitch marker.
Gauge: For dress and bonnet, in stock st, 8 sts = 1"
10 rows = 1"
For booties, in garter st, 71/2 sts = 1"
12 rows= 1"
Pattern Stitches
Lace Knot Pattern (Multiple of 4 + 2)
Row 1 (
wrong side)
: Knit even
loosely.
Row 2: K1, * (P1, K1, P1) loosely in next st, K next 3 sts tog; rep from * across row, ending K1. Mark this row as right side.
Row 3: Knit even.
Row 4: K1, * K3 tog, (P1, K1, PI) loosely in next st; rep from * across row, ending K1.
Note: K3 tog is directly over the (P1, K1, P1) in one st of Row 2. Rep Rows 1-4 for pattern.
Fleur-de-Lis Pattern (Multiple of 22)
In this pattern the abbreviation “SSK” means to sl 2 sts, one at a time, as if to knit (
Fig. 1); then insert left hand needle into fronts of these 2 sts, from right to left; knit them tog from this position (
Fig. 2).

 Rnd 1
Rnd 1 (
right side): * YO, SSK, K 20; rep from * to end of rnd.
Rnd 2: Knit to last 2 sts, K2 tog.
Rnd 3: YO, K1, YO, SSK, K 17; * K2 tog, YO, K1, YO, SSK, K 17; rep from * ending K 18.
Rnd 4: Knit.
Rnd 5: K1, * YO, SSK, K 20; rep from * ending K 19.
Rnds 6-25: Knit.
Rnd 26: K 12, * YO, SSK, K 20; rep from * ending K8.
Rnd 27: Knit.
Rnd 28: K 10, * K2 tog, YO, K1, YO, SSK, K 17; rep from * ending K7.
Rnd 29: Knit. Rnd 30: Rep Rnd 26.
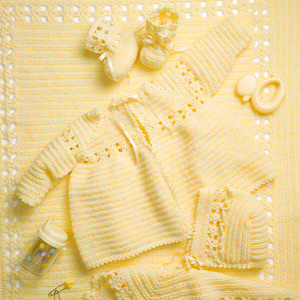
Dress
Skirt Border
Beg at lower edge, with circular needle, loosely CO 262 sts. Work back and forth in rows, do not join work. Work Rows 1-4 of Lace Knot Patt until piece measures 2" from beg, ending by working a wrong side row. Do not break yarn. Cut another piece of yarn about 9" and thread into tapestry needle. Weave ends of border tog from right side; this seam becomes lower right edge of dress. You will now join and work in rnds; place a marker on needle to indicate beg of rnd; sl marker at end of each rnd.
Skirt
Rnd 1 (
dec rnd)
: K 10, * K4, K2 tog; rep from * around 42 times: 220 sts.
Rnds 2-20: Knit.
Rnds 21-50: Work Rnds 1-30 of Fleur-de-Lis Patt. Rnds
51-70: Knit.
Rnds 71-100: Rep Rnds 21-50.
Note: If longer skirt is desired, rep Rnds 21-50 required number of times for length. Additional yarn will be needed for a longer garment.
End of Fleur-de-Lis Patt
Rnds 101-108: Knit.
Rnd 109: Change to straight needles, knit 110 sts. These 110 sts form back of dress; 110 sts are left on circular needle for front of dress, to be worked later.
Note: You will now work back and forth in rows.
Right Back
Row 1 (
wrong side)
: P 55, place these sts on holder for Left Back. K4 (these form button band at center back), P 49, P2 tog. Row 2: Knit. Row 3: K4, purl to last 2 sts, P2 tog. Rows 4-19: Rep Rows 2 and 3, 8 times: 45 sts. Row 20: Knit. Row 21: K2, YO, K2 tog (buttonhole made), purl across. Row 22: K1, * (K3 tog) 3 times, K2 tog, rep from * 2 more times; (K3 tog) twice, K5: 20 sts. Sl rem 20 sts to holder. Finish off.
Left Back
Row 1: CO 4 sts (band), K 53 sts from first holder, K2 tog: 58 sts.
Row 2: Purl across to last 4 sts, K4.
Row 3: Knit to last 2 sts, K2 tog.
Row 4: Rep Row 2.
Rows 5-22: Rep Rows 3 and 4, 9 times: 48 sts.
Row 23 (
dec row)
: K4, * (K3 tog) 3 times, K2 tog, rep from * 3 more times: 20 sts. Sl rem 20 sts to holder. Finish off.
Front
Pick up circular needle with 110 sts and work back and forth in rows.
Row 1: K2 tog, knit to last 2 sts, K2 tog.
Row 2: Purl.
Rows 3-22: Rep Rows 1 and 2, 10 times: 88 sts.
Row 23 (
dec row)
: K3, * (K3 tog) 3 times, K2 tog, rep from * 6 more times, ending K3 tog, K2 tog, K3: 36 sts. Leave these sts on needle.
Puff Sleeves
Change to straight needles and CO 51 sts.
Rows 1-6: Knit.
Row 7: Inc one st in each st by knitting into front and back of each st: you should have 62 sts. Work Rows 1-4 of Lace Knot Patt until piece measures 4", ending by working a wrong side row.
Next Row (right side)
: K1, *K4 tog; rep from * to last st, K1.
Next Row: K 17, sl 17 sts to holder; finish off.
Make second Sleeve in same manner, do
not sl to holder.
Assembling
Sl the 17 Sleeve sts on straight needle to the circular needle which holds the Front sts; sl the 17 sts of other Sleeve from holder to opposite side of circular needle; sl the 20 sts of the Right Back to correct side of circular needle; sl the 20 sts of Left Back from holder to opposite end of needle. With right side facing, sts should be on circular needle in this order: Left Back section, Left Sleeve, Front section, Right Sleeve, Right Back section. You should have 110 sts. Be certain all pieces face in the same direction.
Yoke
With wrong side facing, join yarn at center Back opening; work back and forth in rows.
Row 1: Knit to last st of Left Back section, knit this st and first Sleeve st tog; knit across Sleeve to last st, knit this st and first st of Front section tog; knit across to last st of Front section, knit this st and first st of second Sleeve tog, knit across Sleeve to last st and knit this st and first st of Right Back section tog; knit across rest of Right Back section: 106 sts.
Note: On all rows of Yoke, K4 sts at beg and end to form back button band.
Rows 2-22: Work Lace Knot Patt starting with Row 2 of patt. On Row 13 of Yoke, work buttonhole as before on Right Back. Continue in patt; Yoke should now be about 21/2" deep.
Row 23 (
wrong side)
: K4 (button band), * K2 tog; rep from * to last 4 sts, K4: 57 sts.
Neckband
Rows 1-3: Change to straight needle; knit.
Row 4: Work buttonhole, knit across.
Row 5: Knit.
BO
loosely.
Finishing: From front, weave tog 1" of Lace Knot Patt at underarm Sleeve seam. Sew Sleeves to dress up sides of armhole. Sew back button band at lower edge, lapping the right side over the left side. Steam dress lightly. Sew on buttons.
Booties
Beg at top with size 4 needle, CO 30 sts.
Rows 1-5: Knit.
Row 6 (
right side)
: K1, *(P1, K1, P1) loosely in next st; K next 3 sts tog, rep from * to last st, K1.
Row 7: Knit.
Row 8: K1,* K3 tog, (P1, K1, P1) loosely in next st, rep from * to last st, K1.
Row 9: Knit.
Rows 10-12: Rep Rows 6-8.
Rows 13-16: Knit.
Row 17: K1, purl to last st, K1.
Row 18: Knit.
Rows 19 and 20: Rep Rows 17 and 18.
Row 21: Rep Row 17.
Row 22: K1, (YO, K2 tog, K1) twice; (YO, K2) 9 times; YO, K2 tog, K1; YO, K2 tog: 39 sts.
Row 23: Purl.
Instep Shaping
Row 1: K 26, turn (rem sts are left unworked on needle).
Row 2: K1, P 11, K1, turn.
Rows 3-12: Beg with knit row, work in stock st over these 13 sts, knitting first and last st of each purl row; end by working a purl row. Finish off.
With right side facing, join yarn at beg of Instep at right. Pick up and K 11 sts along right side, K 13 sts across Instep, pick up and K 11 sts up left side, K 13 sts from end of needle: 61 sts. Beg on wrong side, K1, K2 tog, knit across row. Knit 10 more rows on these 60 sts.
Foot Shaping
Row 1: (K1, K2 tog, K 24, K2 tog, K1) twice.
Row 2: K 26, (K2 tog) twice, K 26.
Row 3: (K1, K2 tog, K 21, K2 tog, K1) twice.
Row 4: K 23, (K2 tog) twice; K 23.
Row 5: K 22, (K2 tog) twice; K 22. BO loosely. Sew back and along bottom of foot. Cut two 10" strands of ribbon; thread through eyelets at ankle.
Bonnet
Crown
With size 3 straight needles, CO 98 sts. Work Lace Knot Patt for 4". BO.
Back
CO 16 sts.
Rows 1, 3 and 5: Purl.
Rows 2 and 4: Knit.
Row 6: Inc one st in first st, knit to last st, inc one st in last st. Rep Rows 1-6, five more times. Continue in stock st, knitting the first 2 sts and last 2 sts tog on each knit row for 18 rows. BO. Sew to Crown on inside with back st far enough in from edge to hide inc and dec togs.
Bottom Band
Note: Pick up all sts on needle and then knit. Do not knit each st as you pick it up.
With right side of work facing, and neck edge at top, pick up 30 sts across Lace Knot Patt rows; 16 sts across Back, and 30 sts across pattern rows on other side: 76 sts in all. Join yarn and knit 5 rows even. BO. Cut two 15" pieces of ribbon and sew at sides.


 and yarn. If you want cut costs buy some inexpensive wind chimes at the dollar store and modify them using these patterns. There are eight designs in all to make and you can easily download the pattern to get started on them right away!


 can easily be wiped cleaned when finished using it. It's easy to sew even if you decide to make with vinyl or fabric. Using about 1 yard of fabric and vinyl plus some batting just follow the quick to make pattern and sew up a few for yourself and friends!
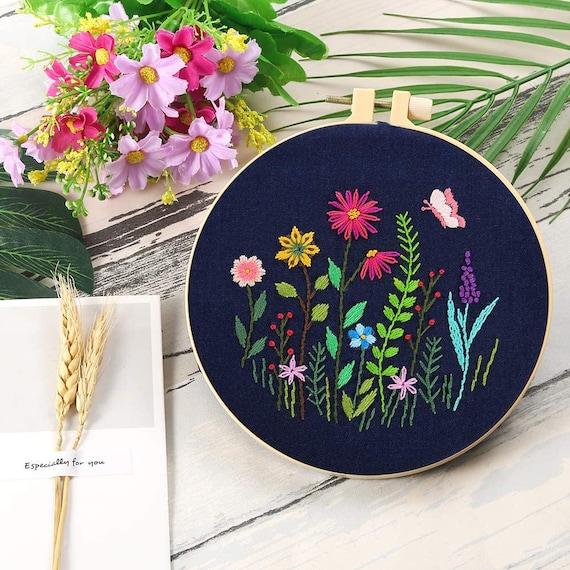
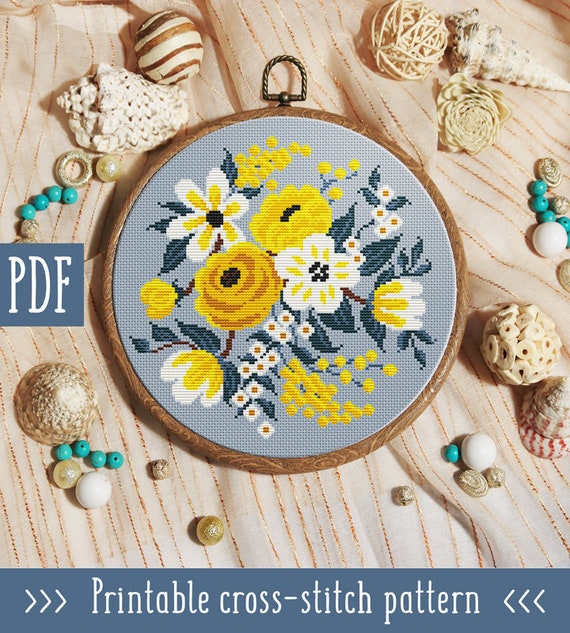
 or 16 Count Aida Cloth. The pattern has full, half and straight stitches.