Tuesday, January 29, 2013

Vintage Crochet and Knitting Patterns Ready to Download

Here's a list of our most recent Crochet and Knitting Patterns that are ready for purchase and download .  We also have a variety of patterns available on 

Super Simple Flower Booties
Bunny Huggy Blanket
Emma's Star II Quilt Pattern Emma's Star II Quilt Pattern
This is a very simple quilt to make!The blocks are separated by sashings that form the stars. You can make as many or as few stars as you want. This quilt goes together fast. You can use up your scraps or yardage requirements are provided. Image featured was made using Marmalade Flannels Fat Quarters, shown below.Finished sizes:; Crib: 40" x 54" using 5 fat quarters; Twin: 67" x 80 1/2" using 13 fat quarters; Queen: 80 1/2" x 107 1/2" using 21 fat quartersSkill Level: Beginner


Beginner's Luck Quilt Pattern Beginner's Luck Quilt Pattern
Grab your fat quarters and get ready to make this quick and easy quilt!This fun beginner quilt is the perfect quick project. With 3 sizes to choose from, you can make them up quickly and give as gifts or keep them for yourself. Image featured was made using River Rock Batik fabric from Avlyn, shown below.Approximate finished sizes:; Crib: 45" x 63" using 12 fat quarters; Lap: 63" x 72" using 20 fat quarters; Bed: 81" x 90" using 30 fat quarters

Sunday, January 27, 2013

Free Pattern Counting Quilt ABC or Numbers Quilt

FREE GO! Qube 12 Alphabet Pillow Pattern


Eric Carle 1,2,3, To The Zoo Numbers White/MultiCount on Me Numbers & Flowers Beige
View Fabrics Featuring Numbers 
An easy way to create a numbers quilt is to purchase fabric with numbers on it and create a stunning quilt of your own,
http://www.anrdoezrs.net/links/971684/type/dlg/https://www.fabric.com/find?searchText=numbers

Let's start counting with this beautiful quilt pattern to make...
This is adorable for a baby, toddler or a wall hanging.
The dotted fabric used adds a little flare to the project
You can view the complete project including the numbers template

Numbers Fabric, Alphabets Fabric:  Fabri-Quilt Back To School Numbers and Letters on White 100% cotton fabric by the yard (FQ72)

Friday, January 25, 2013

Tutorial for a Reversible Crochet Shell Baby Afghan

Learn Reversible Crochet
I love this pattern and it does not seem too difficult to crochet.
It looks pretty in two different colors but of course you can do it in one color of yarn.

Have you found yourself making scarves, shawls and blankets that are beautiful on the front but not so attractive on the back? Reversible crochet to the rescue! When you have completed this all-new Annie's video class, your crochet creations will be a joy to view on the front AND the back. 


Wednesday, January 23, 2013

Save 20% on all Pattern Downloads for 48 Hours

48 hours ONLY - 

Shop downloads in crochet, knitting, quilting and sewing now...


Monday, January 21, 2013

Download Vintage Crochet Pattern Books

Here are a couple of crochet pattern books that can be downloaded in PDF format for you to view and crochet.  The patterns are the complete books and will be emailed to you.  If you have any questions please leave a comment below...  The first book is Television and Radio Scarves Book No. 78 and the other is
Hand Crocheted Ties for Men and Boys


Free Crochet Baby and Girl Dress Patterns

Where can you find a list of free baby crochet dress patterns and dress patterns to crochet for little girls?


Red Heart Child's Chevron Dress, 2 yrs in color


Red Heart Sweetie Pie Dress, 9/12 mos in color


Next Generation Dress (Crochet)

Crochet Pattern So Cute Baby Doll


So Cute Baby
Everyone is loving this adorable baby doll pattern from Annie's
The pattern is an electronic download (PDF) 8 pages
Every little girl will love these adorable babies and accessories!
Stitch this baby boy and girl using medium worsted weight yarn. Each baby is filled with fiberfill 
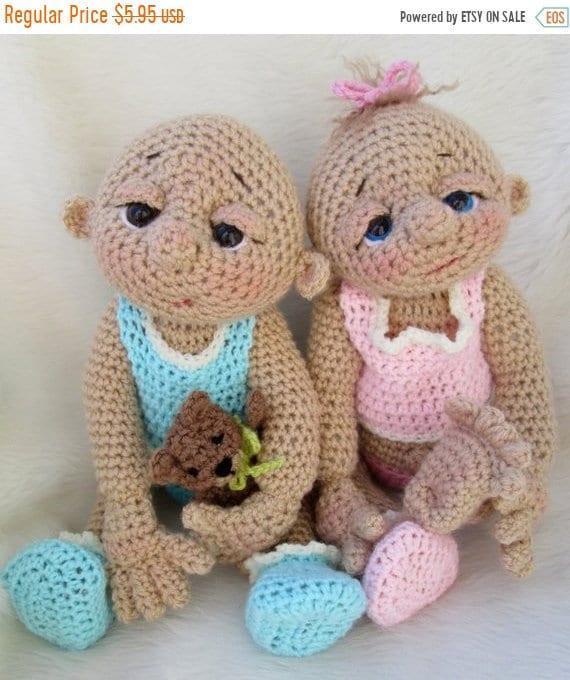
and requires a pair of 15mm safety eyes. Accessories are made using medium worsted or sport weight yarn and include a shirt, booties, teddy bear hat, teddy bear cocoon and a mini teddy bear toy. Helpful tips in the instructions tell you how to put your softie together.

Get the So Cute Baby Pattern

Tuesday, January 15, 2013

Free Knit Slippers Pattern for Men and Women

Bright Tweed Socks
Pattern from 
Finished Size:
Women’s sizes:  (sole length) 9", 9 1/2", 10"
Men’s sizes:  (sole length) 9 1/2", 10", 10 1/2"

1. WOMEN’S SLIPPERS

Size:  Small  Medium  Large
Sole Length: 9" 91/2" 10"
Size Note: Instructions are written for size Small with sizes Medium and Large in braces { }. Instructions will be easier to read if you circle all the numbers pertaining to your size. If only one number is given, it applies to all sizes.
MATERIALS
Worsted Weight Yarn:
33/4 {31/2 -33/4} ounces, [95{100-105} grams, 185{200-210} yards]
Straight knitting needles, size 9 (5.50 mm) or size needed for gauge
Yarn needle
GAUGE: In Garter Stitch, 4 sts and 8 rows = 1"
SLIPPER
Beginning at Heel, cast on 32{36-38} sts loosely.
Work in Garter Stitch until piece measures approximately 63/4"{73/4 ‑73/4}".
SHAPING
Row 1 (Decrease row)K2 tog (Fig. 1, page 2), knit across to last 2 sts, K2 tog: 30{34‑36} sts.

Row 2: Knit across.

Rows 3-10: Repeat Rows 1 and 2, 4 times: 22{26‑28} sts.

Cut yarn leaving a long end for sewing. Thread yarn needle with yarn end and separately slip each stitch from the knitting needle onto the yarn; gather the stitches tightly and secure end. Sew center front seam to within 4{41/4 -41/2}" of cast on edge or to desired opening.

RUFFLE CUFF
With right side facing, pick up one stitch in end of each row along opening (Fig. 5a, page 3).

Row 1 (Increase row): Knit into front and back of each st across (Figs. 4a & b, page 2).

Rows 2-6: Knit across.

Bind off all sts loosely.

Sew back seam.
2. MEN’S SLIPPERS
Size:  Small  Medium  Large
Sole Length: 91/2" 10” 101/2"
Size Note: Instructions are written for size Small, with sizes Medium and Large in braces { }. Instructions will be easier to read if you circle all the numbers pertaining to your size. If only one number is given, it applies to all sizes.
MATERIALS
Worsted Weight Yarn:
31/2" {33/4" -4} ounces,
[100{105-110} grams, 200{210-225} yards]
Straight knitting needles, size 9 (5.50 mm) or
size needed for gauge
Crochet hook (for Tie), size I (5.50 mm)
Yarn needle
GAUGE: In Garter Stitch, 4 sts and 8 rows = 1"
HEEL
Cast on 48{50-54} sts loosely.

Row 1 (Wrong side): K 16{17-18}, P1 (turning ridge), K 14{14-16}, P1 (turning ridge), knit across.

Row 2 (Eyelet row): K3, K2 tog (Fig. 1), YO (Fig. 2), knit across to last 5 sts, YO, K2 tog, K3.

Row 3: K 16{17-18}, P1, K 14{14-16}, P1, knit across.

Row 4: Knit across.

Repeat Rows 1-4 until there are 10{10-11} Eyelet rows, ending by working Row 3.
TOE
Row 1: Bind off 5 sts, knit across: 43{45-49} sts.

Row 2: Bind off 5 sts, K 10{11-12}, P1, K 14{14-16}, P1, knit across: 38{40-44} sts.

Row 3: Knit across.

Row 4: K 11{12-13}, P1, K 14{14-16}, P1, knit across.

Repeat Rows 3 and 4 until piece measures approximately 9{91/2 ‑10}" from cast on edge.

SHAPING
Row 1 (Decrease row)K2 tog across: 19{20-22} sts.

Row 2: Knit across.

Row 3: K3 tog (Fig. 3 1{0-0} time(s) (see Zeros), K2 tog across: 9{10‑11} sts.
FINISHING
Cut yarn leaving a long end for sewing. Thread yarn needle with yarn end and separately slip each stitch from the knitting needle onto the yarn; gather the stitches tightly and secure end. Sew center front seam.
Beginning at top edge, sew back seam to turning ridge; weave yarn through remaining sts; gather the stitches tightly and secure end.

TIE
Using crochet hook, chain desired length (see Crochet Stitches, page 3); finish off. 

Weave Tie through Eyelet row and tie in front.

GENERAL INSTRUCTIONS

ABBREVIATIONS
ch(s)    chain(s)
FC       Front Cross
K          knit
mm      millimeters
P          purl
PSSO   pass slipped stitch over
Rnd(s)  Round(s)
sc         single crochet(s)
SSK     slip, slip, knit
st(s)     stitch(es)
tog       together
YO      yarn over
 — work instructions following H as many more times as indicated in addition to the first time.
† to † — work all instructions from first † to second † as many times as specified.
( ) or [ ] — work enclosed instructions as many times as specified by the number immediately following or work all enclosed instructions in the stitch indicated or contains explanatory remarks.

colon (:) — the number(s) given after a colon at the end of a row or round denote(s) the number of stitches you should have on that row or round.
work even — work without increasing or decreasing in the established pattern.
GAUGE
Exact gauge is essential for proper size or fit. Before beginning your project, make a sample swatch in the stitch, yarn, and needles specified. After completing the swatch, measure it, counting your stitches and rows carefully. If your swatch is larger or smaller than specified, make another, changing needle size to get the correct gauge. Keep trying until you find the size needles that will give you the specified gauge. Once proper gauge is obtained, measure width of piece approximately every 3” to be sure gauge remains consistent.
ZEROS
To consolidate the length of an involved pattern, zeros are sometimes used so that all sizes can be combined. For example, K4{0-1} means size Small would K4, size Medium would do nothing, and size Large would K1.
KNIT 2 TOGETHER (abbreviated K2 tog)
Insert the right needle into the front of the first two stitches on the left needle as if to knit (Fig. 1), then knit them together.
Fig. 1

YARN OVERS 
After a knit stitch, before a knit stitch 
Bring the yarn forward between the needles, then back over the top of the right hand needle, so that it is now in position to knit the next stitch (Fig. 2).
Fig. 2

KNIT 3 TOGETHER (abbreviated K3 tog)
Insert the right needle into the front of the first three stitches on the left needle as if to knit (Fig. 3), then knit them together.
Fig. 3

KNIT INCREASE
Knit the next stitch but do not slip it off the left needle (Fig. 4a). Instead, knit into the back of the same stitch (Fig. 4b), then slip it off the left needle.
Fig. 4a


Fig. 4b


PICKING UP STITCHES
When instructed to pick up stitches, insert the needle from the front to the back under two strands at the edge of the worked piece (Figs. 5a & 5b). Put the yarn around the needle as if to knit, then bring the needle with the yarn back through the stitch to the right side, resulting in a stitch on the needle.
Repeat this along the edge, picking up the required number of stitches.
A crochet hook may be helpful to pull yarn through.

Fig. 5a


Fig. 5b


CROCHET STITCHES
CHAIN (abbreviated ch)
Bring the yarn over the hook from back to front and draw through loop on hook (Fig. 6).
Fig. 6
FREE FOR YOU from Leisure Arts, Inc. ©2012 All rights reserved. These instructions may be photocopied and shared with your friends. They may not be kitted or sold. We have made every effort to ensure that these instructions are accurate and complete. We cannot, however, be responsible for human error, typographical mistakes, or variations in individual work. 

Monday, January 14, 2013

Free Baby Crochet Cocoon Patterns


Want to make something warm and cozy for a new baby in your life?
A cocoon helps baby stay warm while mom is feeding them or while napping close by.


Ready-to-Stitch Plush Stuffed Animals


Alphabet Afghan Cross Stitch
DMC has these fun loving stuffed animals featuring critters and birds that can be cross stitched.

The new Charles Craft Ready-to-Stitch Animal collection provides a delightful and quick way to create a personalized baby gift for someone special. Made of soft plush material and passes all safety child requirements. The Ready-to-Stitch Animals are available in three adorable styles:

Saturday, January 12, 2013

Free Knit Patchwork Baby Afghan Pattern

Patchwork baby afghan knitting pattern

Patchwork Baby Afghan Designed by John Feddersen Jr. 


Finished Size: 37" x 45"
MATERIALS
Worsted Weight Yarn:
16 ounces, (450 grams, 1,040 yards)
29” Circular knitting needle, size 11 (8.00 mm) 
or size needed for gauge
Markers
Yarn needle
GAUGE: In Stockinette Stitch,
14 sts and 18 rows = 4"
See Yarn Overs and Decreases before beginning.
Cast on 116 sts.
Rows 1-6: Knit across.
Row 7 (Right side): K4, place marker, K 12, place marker,   (YO, K2 tog) 6 times, place marker, K 12, place marker; repeat from  3 times more, K4.
Row 8: K4, P 12,   (YO, P2 tog) 6 times, P 12; repeat from  3 times more, K4.
Rows 9-22: Repeat Rows 7 and 8, 7 times.
Row 23: K4, (YO, K2 tog) 6 times,   K 12, (YO, K2 tog) 6 times; repeat from  3 times more, K4.
Row 24: K4, (YO, P2 tog) 6 times,  P 12, (YO, P2 tog) 6 times; repeat from  3 times more, K4.
Rows 25-38: Repeat Rows  23 and  24, 7 times.
Repeat Rows 7‑38 for pattern until Afghan measures approximately 44" from cast on edge, ending by working Row  38.
Last 6  Rows: Knit across.
Bind off all sts in knit.
FINISHING
Thread yarn needle with two 10" lengths of yarn. With right side of Afghan facing, insert needle around center st of each solid square and draw yarn through. Tie knot and trim ends to desired length.

YARN OVER
After a knit stitch, before a knit stitch Bring the yarn forward between the needles, then back over the top of the right hand needle, so that it is now in position to knit the next stitch (Fig. 1a).
Fig. 1a
After a purl stitch, before a purl stitch Take yarn over the right hand needle to the back, then forward underit, so that it is now in position to purl the  next stitch (Fig. 1b).
Fig. 1b


After a knit stitch, before a purl stitch 
Bring yarn forward between the needles, then back over the top of the right hand needle and forward between the needles again, so that it is now in position to purl the next stitch (Fig. 1c).
Fig. 1c
After a purl stitch, before a knit stitch Take yarn over right hand needle to the back, so that it is now in position to knit the next stitch (Fig. 1d).
Fig. 1d

DECREASES
KNIT 2 TOGETHER (abbreviated K2 tog)
Insert the right needle into the front of the first two stitches on the left needle as if to knit (Fig. 2), then knit them together.
Fig. 2


PURL 2 TOGETHER (abbreviated P2 tog) Insert the right needle into the front of the first two stitches on the left needle as if to purl (Fig. 3), then purl them together.
Fig. 3

FREE FOR YOU from Leisure Arts, Inc. ©2012 All rights reserved. These instructions may be photocopied and shared with your friends. They may not be kitted or sold. We have made every effort to ensure that these instructions are accurate and complete. We cannot, however, be responsible for human error, typographical mistakes, or variations in individual work. 

Popular Posts

Total Pageviews