
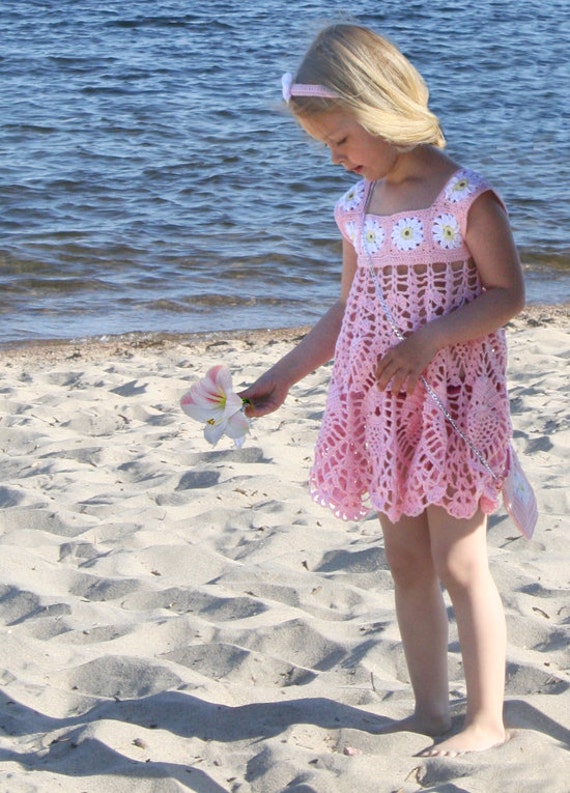
Fingering-weight yarn forms flowing, lightweight fabric that’s perfect for spring and summer dresses. Embroidered daisies and a ribbon tie are the girly touches that will make this dress a favorite. Layer it with a cute skirt or slip, or even a pair of bloomers, to complete the look. Whether you crochet it for a special occasion or everyday wear, it’s sure to become a family heirloom.
Skill Level: Intermediate
Materials
• 560 (610, 650, 725, 750) yards (512 [558, 594, 663, 686]m) of sock yarn: 3 (3, 3, 4, 4) skeins Brown Sheep Company Cotton Fine, 80% cotton, 20% wool, 222 yards (204m), 1 3/4 oz (50g), 3 (3, 3, 4, 4) skeins #CF900 Perry’s Primrose for sundress, plus a small amount each #CF210 Tea Rose, #CF100 Cotton Ball, and #CF345 Gold Dust for embroidery (Note: You can use embroidery floss in place of the yarn for the embroidered details.)
• Size D-3 (3.25mm) crochet hook, or size to obtain gauge
• Size E-4 (3.5mm) crochet hook
• Yarn needle
• 3 buttons, 3/8" (9mm) diameter
• Sewing needle and thread
• 1 1/2yards (1.5m) satin ribbon, 3/8" (9mm) wide
• Size D-3 (3.25mm) crochet hook, or size to obtain gauge
• Size E-4 (3.5mm) crochet hook
• Yarn needle
• 3 buttons, 3/8" (9mm) diameter
• Sewing needle and thread
• 1 1/2yards (1.5m) satin ribbon, 3/8" (9mm) wide
Gauge
21 1/3 sts and 14 rows = 4" (10cm) over hdc with smaller hook.
21 1/3 sts and 14 rows = 4" (10cm) over hdc with smaller hook.
Instructions
Note: The bodice is worked from the waist up to the shoulders. The skirt is then worked from the lower edge of the bodice down to the hem.
Note: The bodice is worked from the waist up to the shoulders. The skirt is then worked from the lower edge of the bodice down to the hem.
Bodice (make 2)
With smaller hook, ch 56 (60, 66, 70, 74).
Row 1 (RS): Hdc in 3rd ch from hook (beginning ch does not count as a st) and in each ch across—54 (58, 64, 68, 72) hdc.
Rows 2–4 (6, 6, 8, 10): Ch 2 (does not count as a st), turn, hdc in each hdc across.
With smaller hook, ch 56 (60, 66, 70, 74).
Row 1 (RS): Hdc in 3rd ch from hook (beginning ch does not count as a st) and in each ch across—54 (58, 64, 68, 72) hdc.
Rows 2–4 (6, 6, 8, 10): Ch 2 (does not count as a st), turn, hdc in each hdc across.
Shape Armholes
Row 1: Turn, sl st in first 0 (0, 0, 1, 2) hdc, ch 2, hdc2tog, hdc in each hdc across to last 2 (2, 2, 3, 4) hdc, hdc2tog; leave any remaining sts unworked—52 (56, 62, 64, 66) hdc.
Rows 2–7: Ch 2, turn, hdc2tog, hdc in each hdc across to last 2 hdc, hdc2tog—40 (44, 50, 52,
54) hdc.
Row 1: Turn, sl st in first 0 (0, 0, 1, 2) hdc, ch 2, hdc2tog, hdc in each hdc across to last 2 (2, 2, 3, 4) hdc, hdc2tog; leave any remaining sts unworked—52 (56, 62, 64, 66) hdc.
Rows 2–7: Ch 2, turn, hdc2tog, hdc in each hdc across to last 2 hdc, hdc2tog—40 (44, 50, 52,
54) hdc.
Shape First Shoulder and Neck
Row 8: Ch 2, turn, hdc in next 12 (12, 12, 13, 14) hdc; leave remaining sts unworked (for second shoulder and neck)—12 (12, 12, 13, 14) hdc.
Rows 9–14: (15, 16, 16, 17) Ch 2, turn, hdc in each hdc across.
Fasten off.
Row 8: Ch 2, turn, hdc in next 12 (12, 12, 13, 14) hdc; leave remaining sts unworked (for second shoulder and neck)—12 (12, 12, 13, 14) hdc.
Rows 9–14: (15, 16, 16, 17) Ch 2, turn, hdc in each hdc across.
Fasten off.
Shape Second Shoulder and Neck
Sk next 16 (20, 26, 26, 26) unworked sts following first shoulder, join yarn in next st.
Row 8: Ch 2, hdc in same st as join, hdc in each remaining hdc across—12 (12, 12, 13, 14) hdc.
Rows 9–14 (15, 16, 16, 17): Ch 2, turn, hdc in each hdc across.
Fasten off. Sew bodice pieces together at side seams.
Skirt
Note: The skirt is worked in the round, from the lower edge of the bodice downward. Do not turn at the beginning of the rounds.
With smaller hook, join yarn in underarm seam on lower edge of bodice.
Round 1: Ch 2, work 108 (116, 128, 136, 144) hdc evenly around lower edge of bodice—108 (116, 128, 136, 144) hdc. Change to larger hook.
Round 2: With larger hook, ch 4 (counts as dc, ch 1 here and throughout), dc in same st as join (beginning V-st made), sk next hdc, *(dc, ch 1, dc) in next hdc (V-st made), sk next hdc; repeat from * around; join with sl st in 3rd ch of beginning ch—54 (58, 64, 68, 72) V-sts.
Round 3: (Sl st, ch 3, 2 dc) in next ch-1 sp, 3 dc in each ch-1 sp around; join with sl st in top of beginning ch—54 (58, 64, 68, 72) 3-dc groups.
Round 4: (Sl st, ch 4, dc) in next dc (center dc of 3-dc group), sk next 2 dc, *(dc, ch 1, dc) in next dc, sk next 2 dc; repeat from * around; join with sl st in 3rd ch of beginning ch.
Round 5: Repeat Round 3.
Rounds 6–23 (25, 27, 29, 33): Repeat last 2 rounds 9 (10, 11, 12, 14) more times.
Round 24 (26, 28, 30, 34): *work (Dc, ch 2, sl st, ch 2, 2 dc, ch 2, sl st, ch 2, dc) in sp between next two 3-dc groups, sl st in sp between next two 3-dc groups (half flower made); repeat from * around; join with sl st top of beginning ch of previous round—27 (29, 32, 34, 36) half flowers.
Fasten off.
Left Armhole, Shoulder, and Neck Edging
Determine which side of the dress will be the front, and mark the front bodice with a stitch marker. Sew the right shoulder seam. Do not sew the left shoulder seam, as buttons will be attached later to make the dress easy to get on and off. With the smaller hook, join the yarn in the top back corner of the left armhole (unseamed shoulder).
Round 1: Ch 1, work sc evenly around entire armhole, across front shoulder, around neck edge, and across back shoulder, working 3 sc in each outer corner of shoulder; join with sl st in first sc.
Round 2: *Ch 4, sk next sc, sl st in next sc; repeat from * around armhole and across front shoulder.
Note: Ch-4 sps across front shoulder will serve as button loops.
Fasten off.
Right Armhole Edging
With smaller hook, join yarn in shoulder seam of right armhole.
Round 1: Ch 1, work sc evenly around entire armhole; join with sl st in first sc.
Round 2: *Ch 4, sk next sc, sl st in next sc; repeat from * around.
Fasten off.
With smaller hook, join yarn in shoulder seam of right armhole.
Round 1: Ch 1, work sc evenly around entire armhole; join with sl st in first sc.
Round 2: *Ch 4, sk next sc, sl st in next sc; repeat from * around.
Fasten off.
Finishing
Weave in all ends. Sew three small buttons on the top back of the left shoulder, opposite the three ch-4 button loops. Using small amounts of contrasting yarn (or embroidery floss), embroider daisies on the front bodice of dress (instructions at right).
Weave in all ends. Sew three small buttons on the top back of the left shoulder, opposite the three ch-4 button loops. Using small amounts of contrasting yarn (or embroidery floss), embroider daisies on the front bodice of dress (instructions at right).
Beginning in the center front of the skirt, thread a ribbon in and out of the V-stitches from Round 2 of the skirt. Tie a bow and trim the ribbon ends.
Tip: The plain bodice of this dress lends itself to embellishment. Decorate it with your own embroidered design, a monogram, or even crocheted or fabric flowers.
How to Embroider Lazy Daisies
Weave the yarn through about 1" of stitches on the wrong side of the front bodice and leave a long tail to weave in later. Push your needle and yarn through to the right side of the bodice where you’d like the center of the daisy to be. (a) Form a small 1/2" (13mm) loop with the yarn; this will be the petal. Reinsert the needle in the same spot where the yarn originally came through, then bring it back through to the bodice front just inside of the petal loop. (b) Reinsert the needle on the outside edge of the petal loop and pull the yarn through to hold the loop in place. Repeat to make 5 petals, or as many as desired, for each flower. Weave in all ends.


Adorable pattern! I'm having a hard time trying to figure out which materials you used for which parts. Can you help clarify? LOVE THIS, want to make one for our almost 3 year old, but just want to be clear what yarn goes with what part.
ReplyDeletehttp://www.womansday.com/cm/womansday/media/Diagrams.pdf (I think this may help you out)
DeleteView original pattern http://www.womansday.com/home/craft-ideas/craft-project-crochet-sundress-119390